Tuesday, June 19, 2012
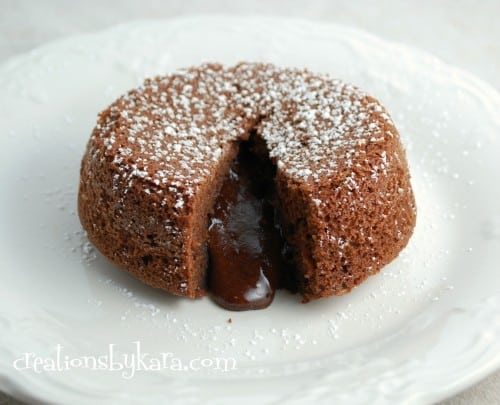
Chocolate Lava Cake
Picture and recipe taken from Creations By Kara. (obviously)
I pinned this recipe a while ago and while deciding what dessert to make for Seth's Father's Day dinner, I came across it again and knew I needed to make it.
It was surprisingly easy and incredibly yummy. I really thought it tasted like a dessert you'd get a restaurant.
Chocolate Lava Cake
6 oz semi-sweet chocolate (I used Baker's chocolate bars found right by the chocolate chips, but the other lady used chocolate chips)
3/4 cup butter
1 1/2 cups powdered sugar
3 eggs
3 egg yolks
9 Tbsp flour
Butter 6 ramekins or custard cups. (I found a pack of 4 custard cups at Target for just over $6 and they came with lids, so I thought it was a pretty good deal.0 Put chocolate and butter in a large glass bowl. Melt in microwave at 50% power, stirring every 30 seconds till smooth. Whisk in powdered sugar till thoroughly combined and melted. Whisk in eggs and yolks. Stir in flour. Divide batter between the 6 ramekins, I actually made 7 and thought the portions were still good. Place on a cookie sheet. Bake in a preheated 425° oven for 13-14 minutes.
You must absolutely serve this with a scoop of vanilla ice cream, it is for sure rich, but oh so yummy. Since it has odd numbers of eggs and yolks you can't really cut it in half for those of you with smaller families, but I bet you could keep the batter in the fridge for a while and just bake a couple at a time. Although, I microwaved our extra ones the next day and they still were yummy. (Although they definitely did not come out as easy of the cups as before.)
Hope you'll splurge on this extra special dessert. :)
Wednesday, May 23, 2012
Banana Pancakes
I found this recipe in an old kids cookbook, that we actually had growing up, that mom gave to the boys. I'm not the hugest fan of bananas, but I really enjoy these and all my boys LOVE them. They are super moist (mashed up bananas will obviously do that) and taste extra yummy with syrup. But they're also a great one for younger babies cause they aren't too dry so they don't need syrup. I just give them whole to Brock and he gobbles up just as many as the other boys.
Banana Pancakes
2 medium bananas (perfect to use up the ones that are going brown, but most recently I used green-ish ones and they were just fine)
2 cups baking mix (like Bisquick, or I'm pretty sure there are recipes on how to make your own Bisquick out there, if I ever try one out, I'll let you know)
1 1/2 cups milk
2 Tbls. sugar
1 egg
Mash bananas in small bowl.
Beat the rest of the ingredients in a medium bowl.
Fold in the mashed banana into batter with rubber scraper.
Pour batter into hot griddle and cook like you all know how. ;)
Enjoy this quick, easy and NOT sugar-filled breakfast!
Tuesday, May 22, 2012
Lemon Crinkle Cookies
Picture and recipe from LDS Living.
If you came to the temple picture making class I did, these are some of the cookies I made. They are some of my most favorite cookie. They're unique, light, and full of yummy flavor. If you like lemon, you'll LOVE these. ;)
Lemon Crinkle Cookies
Makes 2-3 dozen
Ingredients:
½ cups butter, softened
1 cup granulated sugar
½ teaspoons vanilla extract
1 whole egg
1 teaspoon lemon zest
1 Tablespoon fresh lemon juice
¼ teaspoons salt
¼ teaspoons baking powder
⅛ teaspoons baking soda
1-½ cup all-purpose flour
½ cups powdered sugar
Directions:
Preheat oven to 350 degrees. Grease light colored baking sheets with non-stick cooking spray and set aside.
In a large bowl, cream butter and sugar together until light and fluffy. Whip in vanilla, egg, lemon zest, and juice. Scrape sides and mix again. Stir in all dry ingredients slowly until just combined, excluding the powdered sugar. Scrape sides of bowl and mix again briefly. Pour powdered sugar onto a large plate. Roll a heaping teaspoon of dough into a ball and roll in powdered sugar. Place on baking sheet and repeat with remaining dough.
Bake for 9-11 minutes or until bottoms begin to barely brown and cookies look matte {not melty or shiny}. Remove from oven and cool cookies about 3 minutes before transferring to cooling rack.
*If using a non-stick darker baking tray, reduce baking time by about 2 minutes.
MY TIP- the first time I made it was doubling it, so I used 1/2 cup butter AND 1/2 cup margarine (cause I'm cheap like that) and I thought they were delish. The next time, I used only margarine and I could definitely tell they weren't as good. I've never made it with all butter, but I'm sure if you're a butter lover, that would probably make them divine. But using half butter and half margarine is a great alternative.
Monday, May 21, 2012
Slow Cooker Chicken Caesar Salad Sandwiches
Recipe and picture taken from Six Sisters' Stuff.
This was a dinner that all my boys loved, especially Cole, which is saying something since he's the pickiest. It's also very versatile, but I'll give you those tips at the end.
Chicken Caesar Salad Sandwiches
2 pounds boneless skinless chicken thighs or breasts
1/2 to 1 cup of your favorite Caesar dressing
1/2 cup shredded Parmesan cheese (I did use the actual shredded kind, rather than the dried crumbly kind, but then I just put the rest of the cheese in my freezer for next time)
1/4 cup fresh chopped parsley (if you don't have fresh use around 2 teaspoons of dried parsley)
1/2 teaspoon ground pepper
2 cups shredded romaine lettuce
12 slider buns or 4-6 regular sized hamburger buns
1. Place chicken in a 3-4 quart slow cooker with 1-2 cups of water, cover and cook on low heat for 4-6 hours. I also seasoned the chicken with a little bit of minced onion and garlic powder.
2. Remove chicken from cooker using a slotted spoon and drain the water from the slow cooker. Place chicken on a cutting board and pull chicken into shreds, discarding any fat.
3. Place chicken back in the cooker and pour dressing, Parmesan cheese, parsley, and pepper over the top. I really make sure that I discard any fat pieces so by the time I was done I only used about 1/2 cup of dressing but you make need more if you have more chicken. Stir until mixed evenly. Cover and cook on high heat for 30 minutes or until mixture is hot.
4. Spoon 1/4 cup mixture onto each slider bun if you are making sliders or more for regular sized buns. Top with extra shredded Parmesan cheese and lettuce to serve (we also added a little bit of dressing on on the buns).
MY TIPS- I only used maybe 1/4 cup dressing because I was very worried about the taste being too strong for my boys. So it did seem somewhat dry but I just spread some extra dressing on my own bun. Obviously, just remember it's much easier to add to it than take away. ;)
The day later I had some for lunch. I toasted a bun, spread dressing on it, put some lettuce and then the chicken and didn't put on the top bun (trying to eat just a little less carbs when I can stand it :). And I thought that was SO much yummier! I think it was mostly the toasted bun that did it. Delish!
As I was eating it for lunch, I realized this could totally be wrapped up in a lettuce leaf and be so yummy and actually healthy. I'll definitely be trying that next time.
Add some fresh fruit and baked chips as sides and you have an incredibly easy and healthy meal!
This is definitely one I'm adding to my normal list of dinners. :)
Saturday, May 19, 2012
Chocolate Chip Scones
Picture and recipe taken from Creations By Kara.
I love making breakfasts for my boys and when I saw this I knew I had to try it. It's a very easy breakfast to put together and is very delicious. Just make sure to add in some fresh fruit (to your breakfast, not the scones!), so it's not all sugar. ;)
I did not include any toffee because I didn't have any and actually don't really care for the toffee flavor, but I'm sure if you like it, that will only make them tons better.
Toffee Chocolate Chip Scones
2 cups flour
1/2 tsp salt
1 Tbsp baking powder
3 Tbsp sugar
5 Tbsp butter- frozen or very cold
3/4 cup chocolate chips (I used semi-sweet)
1/2 cup Heath toffee bits
1 cup cream (don't skimp or dough is dry)
Sugar for tops
Whisk together flour, salt, baking powder, and sugar in a large mixing bowl. Grate the butter in. (You want it very cold!) Stir in the chocolate chips and toffee bits. Add the cream and stir gently. Knead a few times till dough comes together. It will be crumbly at first, but it will come together. Pat into a 1" thick circle. Cut in wedges and place on a cookie sheet about 1" apart. Brush tops with cream or milk. Sprinkle with sugar. Bake at 400° for about 15-18 minutes or till light golden brown.
TIPS - I did learn that there is a substitute for cream. Use 3/4 cup milk and 1/3 cup melted butter/margarine. The "recipe" said you should not use skim or 1% milk, but some of the reviews said it turned out okay. So now I'm sure you all have these ingredients on hand and can easily whip these up.
Also grating frozen butter is SUPER easy and cool. So much easier than cutting it with a pastry cutter like other recipes call for.
Thursday, May 17, 2012
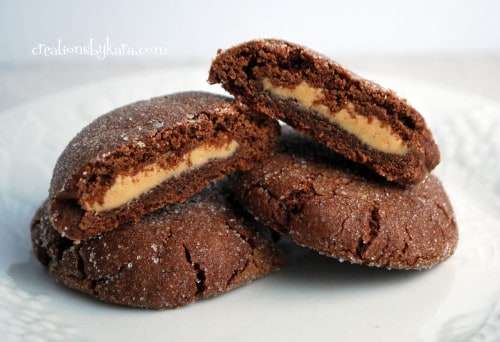
Chocolate Peanut Butter Cookies
Picture and recipe from Creations By Kara.
I made these the other day when we were having presidency meeting at my house so I wouldn't be tempted to eat them all alone. :) And they were super yummy!! And they were all very impressed as they look pretty fancy. They are very rich though, so definitely only make them when you have lots of people to share with.
Magic Middle Cookies
Peanut butter filling:
3/4 cup peanut butter
3/4 cup powdered sugar
Dough:
1/2 cup sugar
1/2 cup brown sugar
1/2 cup butter
1/4 cup peanut butter
1 tsp vanilla
1 egg
1 egg yolk
1 1/2 cups flour
1/2 cup cocoa
1/2 tsp soda
1/4 tsp salt
Sugar for rolling
For filling, stir together peanut butter and powdered sugar till smooth. Cover and chill while you prepare the dough. Beat sugars, butter, and peanut butter till creamy. Beat in vanilla and eggs till well combined. Stir together dry ingredients and add. Stir till well mixed. Roll dough into 24-26 balls. Remove filling from fridge and roll into balls.
To make cookies, take a ball of cookie dough and flatten it out in your palm. Place a ball of filling in the middle. Wrap the dough around the PB filling and pinch together to seal. Roll the ball in your hand to smooth it out. Repeat with remaining dough and filling. Roll the cookie dough balls in sugar and place on lightly greased cookie sheets. Flatten to about 1/2" thick using the bottom of a glass. Bake at 350 for 8-10 minutes.
MY TIP- scoop out all the cookie dough into balls so you'll know how many cookies you'll be making. Then roll the peanut butter mixture into a long snake and cut it into the correct amount to match up with the cookies. Otherwise you'll be like me and have some in the beginning with very little filling cause you have no idea how much to put in and then some at the end with TONS.
These are really quite easy for how impressive they look. Enjoy!!
Monday, April 30, 2012
WHITE WHITES
Okay so I know I already told some of you, but I just wanted to blog about it to remind you and tell you again....
For really WHITE WHITES:
Equal parts of Dawn soap and Hydrogen peroxide.
That's it.
For tougher stains scrub it on with a toothbrush. I soaked our garments in 1 cup of the mixture and enough water to cover all the clothes and it helped a ton!
SO SO happy I learned this trick cause it was awesome!!!
Works on all clothing. Works safely on colors also. (try it on armpit stains, oil, grease, anything really!!)
Cleaning tip #2:
If you have ANY of that gross build up around your sinks, tubs or anything similar all you need is vinegar.
Wet a paper towel with vinegar and then place the paper towel over the build up. Let it sit. (works best if you have vinegar in a spray bottle) Spray the paper towel periodically for the next 20-30 min or so. I scrubbed mine with a toothbrush in between just to really get it off. Viola!! That's it. It will be sparkeling clean, just like new!!
Oh my gosh just writing this made me so excited to go clean my house. Too bad I'm at work. We should get points for cleaning. I really like cleaning.
Happy cleaning everyone!!!
Wednesday, April 25, 2012
Seriously. So good. So easy!
Okay are you ready for one of the easiest dinners you'll ever make??? Oh, and it is yum yum yummy!
Ingredients:
-3 or 4 chicken breast
-1/4 cup Parmesan cheese
-1/8 cup mayo
-1/8 cup sour cream
-italian bread crumbs (I just used plain and added garlic salt, pepper, etc)
Pre heat oven to 425. Lay chicken breast flat on cookie sheet. (I cut mine in half or thirds only cause I prefer all my chicken to be in smaller strips). Mix Parmesan, mayo and sour cream together then spread over the top of chicken. Sprinkle bread crumbs over top covering chicken. (thin layer). Cook for 20-30 min until chicken is done.
That's it!!! The first time I made it I used all mayo cause that's what the recipe said but the 2nd time I wanted to make it less fatty and did sour cream and it was way better! I bet you could try all sour cream too if you wanted or even Greek yogurt?!?
Goes great with lots of different sides! Yum!! Try it and let me know what you think!!! Just make sure to eat it before 8:00pm!! ;)
Wednesday, April 18, 2012
hello Chinese girl...
I need to start this out by reminding us all of that one time the little boy walked up to Bone and said, "Helloooo Chinese girl!" hahaha...
The other night I made baked sweet and sour chicken. http://pinterest.com/pin/160370436701021095/ You can re-pin it here if you'd like.
I thought it was fairly easy and really YUMMY! Loo, I bet you could try this with tofu too..I think it would be delish!
Baked Sweet and Sour Chicken Recipe:
Chicken:
3-4 boneless chicken breasts
salt & pepper, to taste
1 cup cornstarch
2 eggs, beaten
1/4 cup canola oil (I just used veggie oil.)
Sweet and Sour Sauce:
3/4 cup sugar
4 tbs ketchup
1/2 cup vinegar
1 tbs soy sauce
1 tsp garlic salt
Preheat oven to 325 degrees. Rinse your chicken breasts in water and then cut into cubes. Season with salt and pepper to taste. Dip chicken into the cornstarch to coat then dip into the eggs. Heat your 1/4 cup oil in a large skillet and cook your chicken until browned but not cooked through. Place the chicken in a 9x13 greased baking dish. Mix all of your sweet and sour sauce ingredients in a bowl with a whisk and then pour evenly over the chicken. Bake for one hour and during the baking process you will need to turn the chicken every 15 minutes.
Curtiss and I both loved it and we will be making it again for sure!!!
The other night I made baked sweet and sour chicken. http://pinterest.com/pin/160370436701021095/ You can re-pin it here if you'd like.
I thought it was fairly easy and really YUMMY! Loo, I bet you could try this with tofu too..I think it would be delish!
Baked Sweet and Sour Chicken Recipe:
(Recipe from Life as a Lofthouse)
3-4 boneless chicken breasts
salt & pepper, to taste
1 cup cornstarch
2 eggs, beaten
1/4 cup canola oil (I just used veggie oil.)
Sweet and Sour Sauce:
3/4 cup sugar
4 tbs ketchup
1/2 cup vinegar
1 tbs soy sauce
1 tsp garlic salt
Preheat oven to 325 degrees. Rinse your chicken breasts in water and then cut into cubes. Season with salt and pepper to taste. Dip chicken into the cornstarch to coat then dip into the eggs. Heat your 1/4 cup oil in a large skillet and cook your chicken until browned but not cooked through. Place the chicken in a 9x13 greased baking dish. Mix all of your sweet and sour sauce ingredients in a bowl with a whisk and then pour evenly over the chicken. Bake for one hour and during the baking process you will need to turn the chicken every 15 minutes.
Curtiss and I both loved it and we will be making it again for sure!!!
Tuesday, April 17, 2012
current playlist
I thought it would be fun to share some of the songs all my family is listening to. Like all the time. These are all by Fun (We Are Young) and are probably old news, but just in case you haven't heard them. :)
The boys are constantly requesting we listen to these songs
(And just in case you're like me, listen to them once (or part of them) and you'll think they're a little odd and then come back to them a day or two later and you just may like them a lot more than you thought you would. ;)
So what songs are you listening to most right now?
I'd love to add some new songs to our mix. Especially some new country ones. Although the boys would strongly disagree on that.
Tuesday, April 3, 2012
Baked Chicken Bacon Ranch Taquitos
I found this recipe here.
These were pretty tasty. The older boys ate more than I did, so that's saying something. Her recipe seemed like it'd make a ton and since I hadn't tried them yet, I cut it in half and that made about 14 still. She does mention that they work as freezer meals, so you could use her quantities and stick a bunch in the freezer for meals later on.
Baked Chicken Bacon Ranch Taquitos
Ingredients:
4 oz cream cheese, softened (I used Neufchatel cheese)
6 slices of bacon, cooked and crumbled (my new favorite way to cook bacon is in the oven!)
2 cups cooked, shredded chicken
1 (1 oz) packet dry Ranch Dressing mix (here is a recipe for a homemade Ranch Dressing mix)
1 cup Monterrey Jack cheese, shredded (I used more, probably like 1 and 1/2 cups)
3-4 Tablespoons green onion, chopped (I didn't use these)
12 (6-inch) flour tortillas (the quantity just depends on how full you fill them)
Salt
Non-stick cooking spray
Directions:
Preheat oven to 425 degrees.
Cover a large cookie sheet with aluminum foil and spray lightly with cooking spray.
Mix together cream cheese, chicken, bacon, cheese, and green onions. Add in about 1/3 of the dry Ranch dressing mix and taste- add more if you want more of a Ranch taste. (It's hard to know how much you're adding in, but I think I did about 1/3 and it didn't have too much of a ranch taste, so I'm not sure how necessary it is, unless you want to add more and have a big ranch taste. Next time I make them I'll probably leave this out completely and see if anyone misses it.) Mix well. Spoon 2-3 tablespoons of the chicken mixture into a flour tortilla and roll it up.
Place taquito seam-side down on the baking sheet. Repeat about 12 times (I had to use two baking sheets). Once finished, spray the tops of the taquitos with non-stick cooking spray (or you could lightly brush some olive oil on them) and sprinkle with salt (I used Kosher salt, the bigger granules and really liked it for this).
Place pan in oven and bake for 15-20 minutes (or until edges and tops are golden, mine started getting golden more around 10).
Thursday, February 23, 2012
Homemade BBQ Beef Sandwiches
{I love love LOVE the crock pot. So I'm always trying to find recipes to use it. This one is great any time of year.}
1 1/2 cup ketchup
1 1/2 tsp Worcestershire Sauce
1/2 tsp Chili Powder (add more, if desired)
1/2 tsp Garlic Salt
1/2 cup brown sugar
Combine sauce ingredients. Set aside.
Take a 2-3 lb chuck roast and brown it on all sides. (This is actually the first time I've followed that step and it did turn out to be the softest, shreddiest ;) meat I've done in the crock pot, so I think it actually did probably help. Contrary to my previous beliefs that the step was just a time waster.)
Put the roast in a crock pot and dump all the sauce on top.
Add half a can petite (important when you have picky boys and husband) diced tomatoes. (I added a whole for this one and Seth said it was way too tomatoey. While I still liked it, the sauce definitely didn't shine like normal, so I'll stick with half. Or I guess you could also not add it at all, but it all may get too dry in the crock pot without the extra juice the tomatoes provide.)
Cook on LOW for at least 6 hours, preferably 8.
Enjoy!
This meat freezes perfectly. And this recipe makes enough for our family for 2 meals. So we'll eat it for one night and then put the rest in a freezer bag to be eaten later on. Just in case you didn't know the definition of 'freezer meal' ;)
Wednesday, February 22, 2012
My Fitness Pal
Today my friend showed me this app called My Fitness Pal. I haven't explored all that's possible, but at the very beginning you enter in your age, height, weight, how often you exercise, etc. and then you can state your goal weight, and it gives you a target number of calories to eat each day! Then you can enter in everything you ate that day and it subtracts it from the number of calories you should eat...
What's awesome, too, it that it tells you how much of your daily value of certain nutrients you've eaten so far!! So you know to try and eat less saturated fat, and more iron... (or maybe that's just me, haha)
It also can keep track of your waist size, hip size, and even neck size if you care to measure those. :)
Anyway, I downloaded the app and started entering in info, for example, this morning I ate an omelet for breakfast... so I started typing in: 1 large egg, shredded cheddar cheese, onion, green pepper, tomato... and it got super tedious. So I was fairly disillusioned with it. BUT THEN I figured out you can type in a whole recipe! I still had to type everything in, but now it's saved and so next time I eat an omelet I just have to find it on m recipe list. (Super convenient if you eat a lot of the same foods—like me)
you can download the free app on your phone... or iPad, or you can use the website: www.myfitnesspal.com.
supposedly it's a good reminder to be healthy if you keep a food diary... but I've never been successful at that. Plus then you have to find all this info on your own for it to even mean anything. Hopefully this app will make that a lot more convenient! It's at least worth a try since it's free, right?
Quick 10 Minute Workout Video
I just wanted to share a link to a 10 minute workout. It's only ten minutes... and who doesn't have ten minutes? And it actually gets me out of breath real quick. I love it for days when I just don't have time to work out more (or make excuses that I don't have time :). After all, this is a whole lot better than nothing!! Plus exercising in the morning always makes me eat better for the day because I don't want to waste the 200 calories that I burned (if that!) on junk food.
I'd love to know if you all try it!
Thursday, February 16, 2012
Walnut Blondies with Maple Butter Sauce
Okay, as if that title needs any more of an introduction... THESE ARE SO GOOD. I made a batch on Sunday... minus the walnuts and the white chocolate chips, hahaha. Even without they were still sooo delicious. Then Ging and I made the real recipe on Tuesday, and they were at least 10 times yummier. That said, here are a few notes:
- These are super rich, so I would definitely recommend eating them with plenty of ice cream. :)
- I didn't make the sauce either time, so I don't know if that's hard... Plus, like I said, it's super rich, so I think it's fine without. But if anyone makes it with the sauce, let me know.
- I think this recipe might be easier to make if you double it... just because of some of the weird measurement sizes.
- When I baked it at my house, I used a 9 x 9 pan, and they cooked just fine. At Ginger's we put it in a pan that was a little smaller—so they were thicker—and we had to cook them for extra time and they still ended up a little doughy in the middle.
http://www.recipesecrets.net/blog/recipes/copycat-applebees-walnut-blondie-with-maple-butter-sauce/
Saturday, February 11, 2012
Fun Cooking Tips
Hello- I decided to finally post something on here. I am working on putting a whole bunch of recipes together- but if you don't like artichokes and sun-dried tomatoes maybe you won't like my recipes either? Well anyway, here are a few cool tips I've found lately.
This is so great! It takes me more than 10 seconds, but it still works pretty quick, and then your fingers don't smell like garlic! Cool!
http://www.youtube.com/watch?v=0d3oc24fD-c
I found this a while ago when a recipe called for red wine. It seemed to work great. The recipe was for home-made beef vegetable soup, I'll try to post it some time.
http://homecooking.about.com/library/archive/blalcohol6.htm
Wednesday, February 8, 2012
Fake Eyelashes
But, I decided I would finally post it on here because THREE different people have asked me if I was wearing fake eyelashes!! Jeeeez.
It's insanely easy and if you do it consistently it seems to work pretty fast.
Apply castor oil to base of eyelashes before bed. Simple as that.
I found castor oil at a health store (a bottle way bigger than I'll ever finish for $15.00). I bought the oil a few months ago, intending to use it every night but did it maybe three times. Last week, I cleaned out an empty mascara tube and filled it with castor oil. I would NOT recommend doing this unless you have FAR TOO MUCH time on your hands. Its super easy to apply once it's in there, it just took longer than I'll ever admit. Anyway, after applying it every night for a little over a week I can completely see that they are longer and fuller! YAHOO!
Thursday, February 2, 2012
Cowboy Quesadillas
I've made these for dinner twice now, and have loved them both times. The boys don't care for them but I'll keep making them try. :) On a side note, they used to hate Hawaiian Haystacks and would only have rice and cheese on it, no sauce or anything and then cucumbers on a different plate on the side and just this past week when we had them, they ALL were putting EVERYTHING on top of their rice. It was too cool! ;)
They are definitely a quick meal and super healthy, at least in my opinion. You could also easily leave out the chicken -Linda- and it would still taste great.
When you first read it, it sounds not too yummy or kinda like a weird combination of things, at least to me, but the first time I tried it, it was like 6 at night and I still had no clue what to make for dinner and happened to have all these ingredients on hand. So glad I tried it.
Here's the link to where I got it - http://www.ourbestbites.com/2010/10/cowboy-quesadillas/
Cowboy Quesadillas
Recipe by Our Best Bites
1/2 C white rice - leftover rice (because who would really cook just a little)
1/3 C black beans
1 cup diced cooked chicken
1/3 C fresh frozen corn kernels (no need to thaw)
2/3 C diced tomato
3 Tbs sliced green onion - I've never added this
1 1/2 C shredded cheese (any type or combo you like)
1/4 C bbq sauce
6 small tortillas (fajita size, about 6″) - I used 5 bigger ones
Dipping Sauce
equal parts bbq sauce and ranch dressing - I think I did this the first time and liked it *I think*, but didn't do it this most recent time, so I can't say for sure
Combine rice, beans, chicken, corn, tomato, green onion and shredded cheese. Add bbq sauce and stir to combine. Place about 1/3 C of mixture on half of each tortilla and fold over to close.
Heat a skillet to medium heat on the stove top. When hot, spray lightly with cooking spray, or drizzle with canola or olive oil. Place quesadillas in pan and cook for 2-4 minutes or until golden brown and slightly crisp. Flip and repeat on opposite side. Cool for a few minutes and then serve with BBQ-Ranch dipping sauce.
Enjoy!
Subscribe to:
Posts (Atom)